Supplementing insidemylaptop's excellent guide on disassembling the HP DV8 Pavilion, in the following wizard I will show how to disassemble the display components to replace the internal video cable. The tutorial can also be used to replace the other components (webcam-microphone, inverter, wireless antenna).
This wizard assumes that you arrived at STEP 21 (taking apart the display from the rest of the notebook) of the insidemylaptop tutorial and will be supported by photos and screenshots from HP's official Service Manual. You can click on the figures to enlarge them.
pic.1
Of all the components visible in picture 1 I will replace the 2c video cable because after many years it causes screen flickering and shutdown due to internal injury of the cable near the screen joint (the screen turns on and off by squeezing the cable).
Components for these dated PCs are rare by now and in my case I managed to find it on ebay paying about 36 euros and importing it from the UK. In pic.2 the video cable for the HP Pavilion DV8 1010el (1000 series).
pic.2
1. After STEP 21 of the insidemylaptop tutorial the display will look like this:
pic.3
2. Remove the stickers indicated with number 1 in picture 4 and unscrew the 4 screws
pic.4
pic.5
3. Turn the display upside down (
pic.5) and with the help of the removal kits such as paddles and pick-ups unhook the plastic
backcover from the display frame (
pic.6) being careful not to bend the plastic too much before unhooking the cover all around the display frame
pic.6
pic.8
4. When the backcover is completely unfastened move it slightly (pic.8) to reveal the wire that goes to power the HP back LED before taking apart the backcover from the display frame.
pic.9
pic.10
5. The wire to be disconnected is number
3 in
picture 9. In this specific case I found the wire under the hinge cover so I proceeded to disassemble it by unscrewing the 4 screws in
picture 10. Once the flap was removed, gently disconnect the wire visible in
pic.11 (before being disconnected) and
pic.12 (after being disconnected)
pic.11
pic.12
6. Now you can take apart the
backcover from the display (
pic.13)
pic.13
pic.14
7. The back part of the display will look like in picture 14. The cable video is shown in pic.15
pic.15
8. Peel off the sticker (n.1 pic.16) that keeps the top of the wiring secured to not be disconnected with shocks.
Once the sticker is lifted, disconnect the yellow-colored wiring. Highlighted with the number 1 in pic.17.
Next, disconnect the wiring number 2 from pic.17 (or n. 3 in pic.16) that connects the display to the inverter. Disconnect the cable by applying light pressure to the plastic first from the right side and then from the left side until it can be disconnected. Do not use too much force or you may damage the inverter port.
pic. 16
pic. 17
9. Replace the video cable with the new one and reconnect wiring
1 and
2 visible from
pic.17. Completed this operation, move the cables near the display joint, according to
pic.18, before closing the flap removed in
step 5 of this tutorial.
pic.18
9-bis. If you need to replace the webcam you can proceed now, before closing the hinge cover.
Unscrew the screw number 1 (pic.19), lift the webcam out of the housing and disconnect the wiring (visible in pic.20), helping yourself with a screwdriver by loosening it slightly to the right and then to the left until it is free to come out. Caution: do not pull directly the cable or you may damage it.
Replace the webcam and its cable with the new ones.
pic.19
pic.20
10. You can now proceed with the reassembly of the display by following in reverse steps number 1 through 6 of this wizard. Do not forget to reconnect the HP back LED before re-attaching the backcover to the display frame (step 5).
Picture 21 shows the final result.
pic.21
Insight:
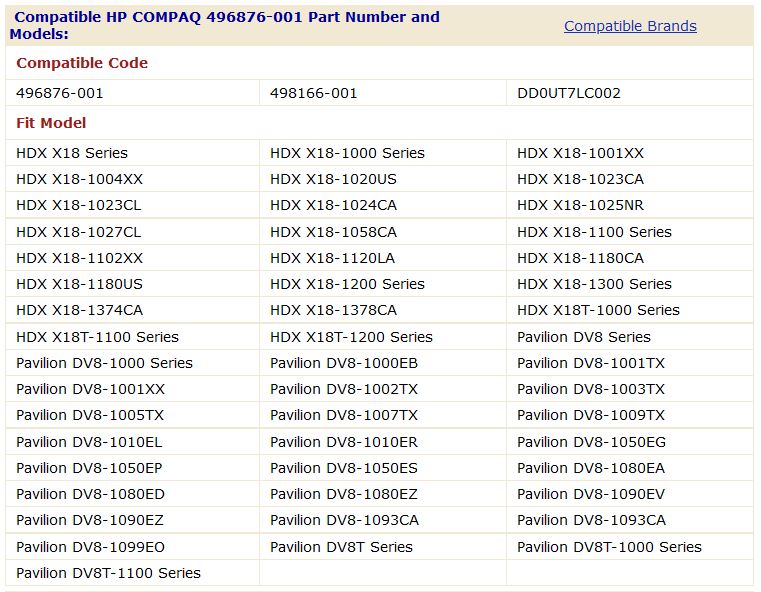
In
pic.22 you can check the compatibility of the cable with spare part number 496876-001 according to the HP
Service Manual. In my case I purchased a cable code DD0UT7LC002 (which you can see in the third column) and I had perfect compatibility with my old cable.
The source of the compatibility chart is the
battery-adapter website. I specify that I purchased the cable on
ebay and not on this website.
pic.22
or use the QR code:


Nessun commento:
Posta un commento